 13Jun

If you are a master of something and want to teach it to your audience, you need a website to sell online courses. There are many options available, but WordPress is one of the best platforms for creating a video course website.
In this tutorial, we will discuss how to sell online courses on WordPress website step by step. We will cover both free and paid options so that you can easily understand which setup is best suited to your requirements.
Whether you want to teach students, sell professional training courses, or create an online coaching platform, WordPress gives you the flexibility to build a website according to your needs.
What Is WordPress?
Before starting the main topic, how to sell online courses on WordPress, let’s first understand what WordPress is.
WordPress is a content management system (CMS) that allows you to create and manage websites without building everything from scratch. You can use it to create a simple blog, a business website, an online store, or an online learning platform.
One of the biggest advantages of WordPress is its plugin ecosystem. You can add new features to your website by installing plugins instead of developing every feature yourself.
For example, an LMS plugin can help you create courses, add video lessons, organize quizzes, manage students, and sell access to your courses.
You can also customize your website’s design using themes and page builders, such as Elementor.
Is WordPress a Good Choice for a Course Website?
Certainly! WordPress can be a good choice for creating an online course website, especially if you want control over your website’s design, content, and functionality.
You just have to select the right hosting, plugins, and theme according to your requirements.
WordPress is particularly useful when you want to:
- Sell video courses and training programs.
- Create lessons, quizzes, and assessments.
- Accept online payments for courses.
- Offer one-time course purchases or subscriptions.
- Customize your course pages and student dashboard.
- Build a learning website that can grow with your business.
However, WordPress is a self-managed solution. You may need to handle updates, backups, security, hosting, and performance optimization.
Plugins and Themes Needed to Create a WordPress Course Website
Choosing plugins mainly depends on your requirements, but there are a few important components you should consider for a WordPress course website.
1. LMS Plugin
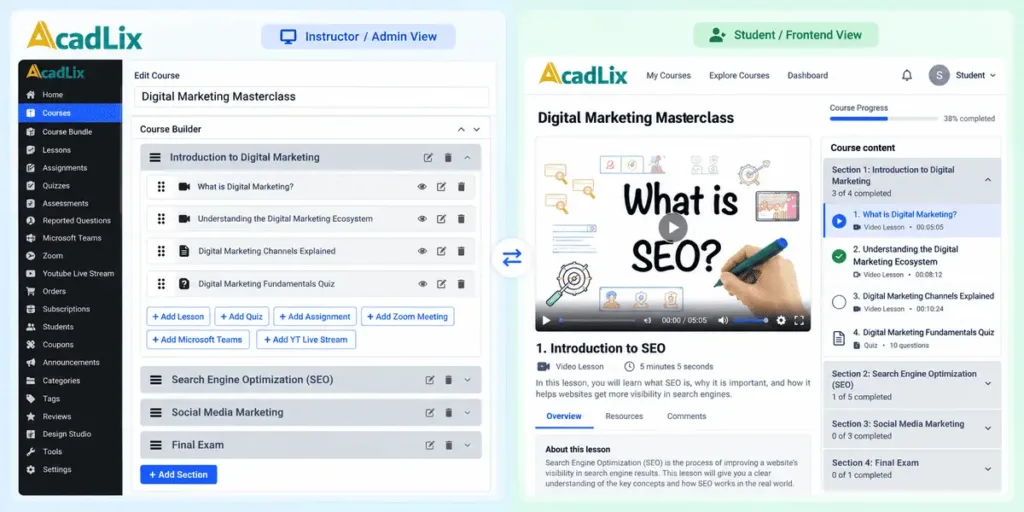
An LMS (Learning Management System) plugin is the most important component of your course website. It helps you create courses, organize lessons, manage students, and provide a learning experience through your website.
You can choose a lightweight and feature-rich LMS plugin like Acadlix for your WordPress course website.
Acadlix is a WordPress LMS and quiz plugin that supports course creation, video lessons, quizzes, certificates, and built-in eCommerce. It can be useful for educators who want to sell courses as well as those who need assessments and exam-focused features.
Before selecting an LMS plugin, check whether it provides the features you actually need. Some plugins focus mainly on video courses, while others offer more advanced quiz and examination functionality.
2. SEO Plugin
An SEO plugin helps you optimize your website for search engines. You can use it to configure page titles, meta descriptions, XML sitemaps, and other SEO settings.
Popular options include Rank Math, Yoast SEO, and All in One SEO.
Remember that installing an SEO plugin alone will not make your website rank. You also need useful content, a well-organized website structure, good performance, and relevant internal links.
3. Security Plugin
Your course website may contain student accounts, enrollment information, and payment-related data. Security should therefore be considered from the beginning.
A security plugin like Wordfence can help you monitor threats and strengthen your WordPress security.
You should also use strong passwords, keep WordPress and plugins updated, maintain regular backups, and configure HTTPS. No single security plugin can protect a website against every possible attack.
4. Design Plugin
Elementor is a widely used page builder for designing WordPress websites. You can use it to design your homepage, landing pages, course information pages, and other sections of your website.
Before selecting a page builder, check whether your LMS plugin is compatible with it and whether you can customize the course pages as required.
5. Theme
You need a suitable WordPress theme to organize your website’s design.
You can consider a lightweight theme like Astra or use Elementor’s Hello theme as a starting point for a custom design.
The right theme depends on your design requirements, performance expectations, and compatibility with your LMS plugin.
You do not need to install many design plugins at the beginning. Start with the components you actually need and add more only when necessary.
How to Choose an LMS Plugin for WordPress
When you want to sell a video course on WordPress, be careful when choosing an LMS plugin. Changing your LMS later can require migrating courses, quizzes, student records, and other data.
Here are the key points to consider when choosing a WordPress LMS plugin.
1. Core Features
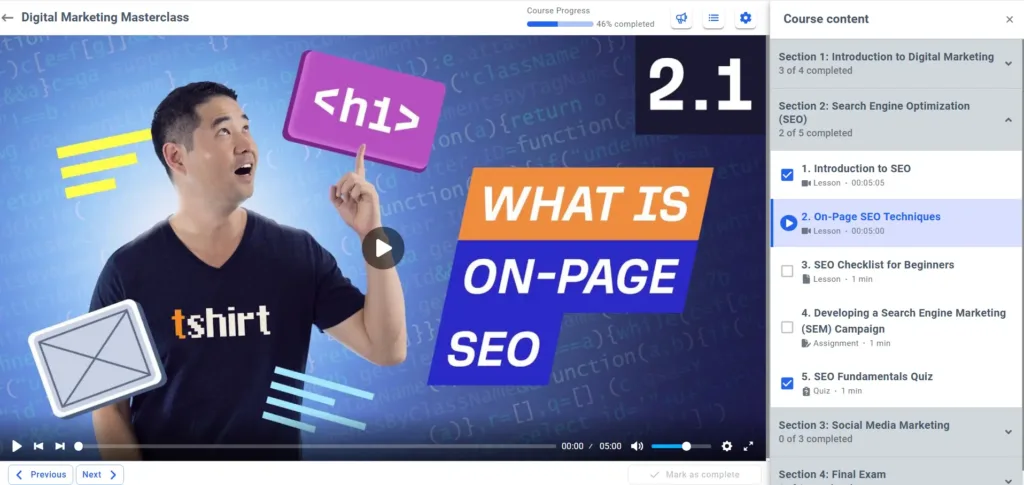
An LMS plugin must have the core features you need to deliver your courses.
For example, check whether it supports different video sources, including YouTube, Vimeo, external video URLs, CDN-hosted videos, and videos uploaded to your own server.
You should also check its course builder, lesson organization, quiz module, and student progress features.
If you teach subjects that require regular assessments, a configurable quiz module is particularly important. It should support the question types and scoring methods needed for your examinations.
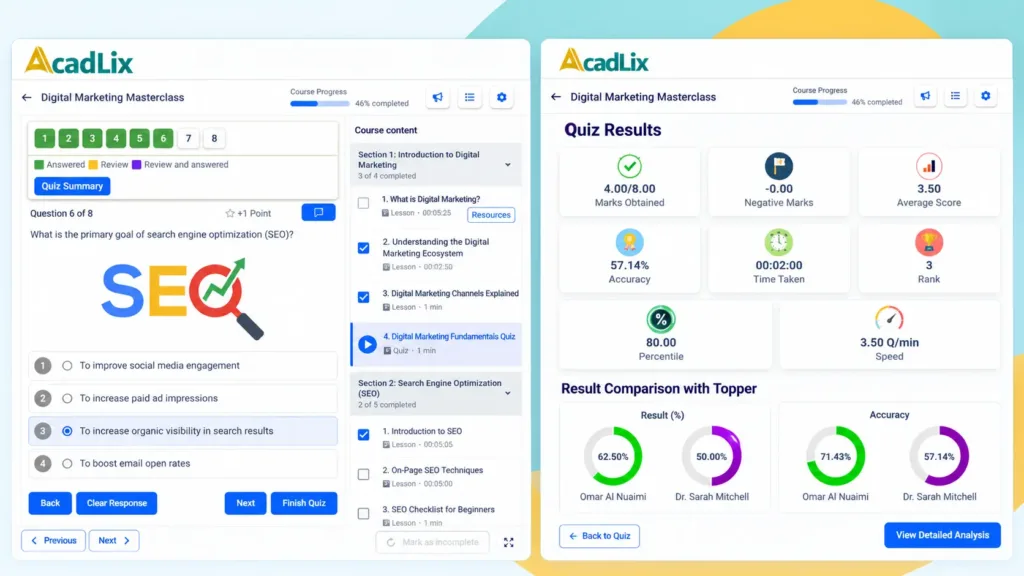
For example, a competitive exam preparation website may need more advanced question types and result analysis than a website selling a simple video training course.
2. Security Features
A course website should provide appropriate controls to restrict access to paid courses and lessons.
Check whether the LMS supports enrollment-based access, student account management, and suitable restrictions on course content.
Some plugins offer right-click restrictions or other basic measures to discourage copying. However, disabling right-click does not prevent screenshots, screen recording, or all methods of downloading content.
If video protection is important to your business, consider using a suitable video hosting service and access controls alongside your LMS.
3. Authentication and Student Login
You cannot ignore the login and registration experience because students need to access their courses regularly.
Check whether the LMS provides customizable login and registration forms and whether it supports the authentication options your audience needs.
Depending on your requirements, these may include social login, email or SMS OTP, and multi-factor authentication through the plugin or compatible integrations.
A good student login experience should be simple, especially on mobile devices. At the same time, it must maintain appropriate security.
I would prefer an LMS that provides the essential student-facing functionality itself, rather than requiring a separate plugin for every small customization. However, additional plugins may still be necessary for advanced authentication requirements.
4. Built-in eCommerce
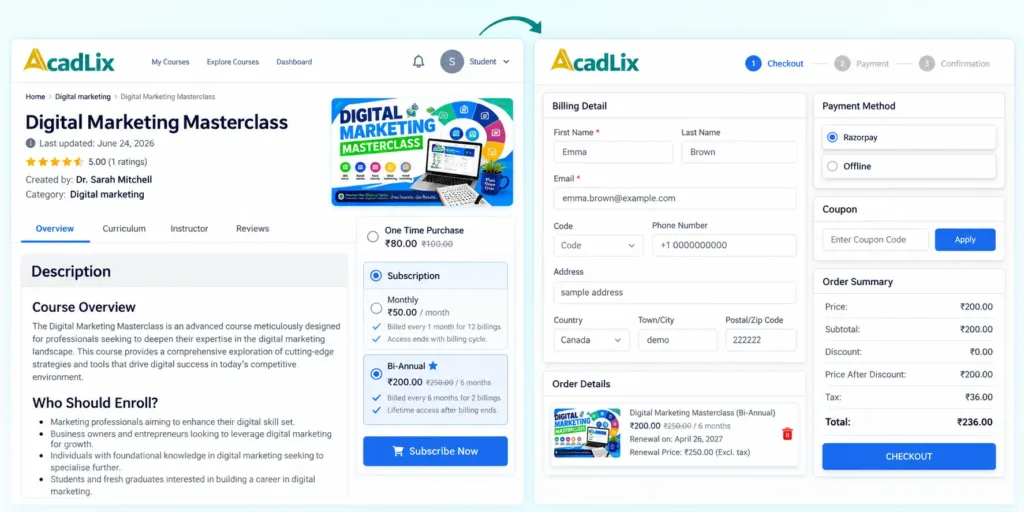
This is an important point to consider when choosing a WordPress LMS plugin.
Some LMS plugins depend on WooCommerce or another eCommerce plugin to sell courses. Others provide built-in eCommerce functionality.
If you are building a website mainly to sell courses, a plugin with built-in payments may simplify your setup and reduce the number of components you need to manage.
For example, Acadlix supports built-in eCommerce with payment integrations such as PayPal, Razorpay, Stripe, and PayU. This allows you to sell courses without requiring WooCommerce for the supported purchasing workflows.
You should also check whether the LMS supports your preferred payment gateway, currency, and business location.
If you plan to sell physical products, manage a large product catalog, or use advanced eCommerce integrations, WooCommerce may still be the right choice.
The objective is not to avoid WooCommerce in every situation. It is to select the simplest setup that meets your actual requirements.
5. One-Time Payments and Subscriptions
Think about how you want to sell your courses.
You may want to charge students once for lifetime or fixed-period access, or you may want to offer recurring subscriptions.
If you plan to offer memberships, check whether the LMS supports recurring payments, subscription duration, enrollment fees, trial periods, and subscription cancellation rules as required.
Acadlix provides subscription functionality for supported course-selling workflows, making it possible to build a recurring-revenue model without automatically adding a separate eCommerce platform.
Check the available features and payment gateway requirements before deciding on your subscription structure.
6. Compatibility With Page Builders
Your LMS plugin should work with your preferred page builder if you want complete control over your website’s design.
For example, Elementor can help you customize your homepage, landing pages, and course-related pages.
Acadlix also provides an Elementor add-on for supported design workflows.
Before committing to an LMS, check which elements can be customized and whether the student dashboard can be designed according to your expectations.
7. Mobile-First Student Experience
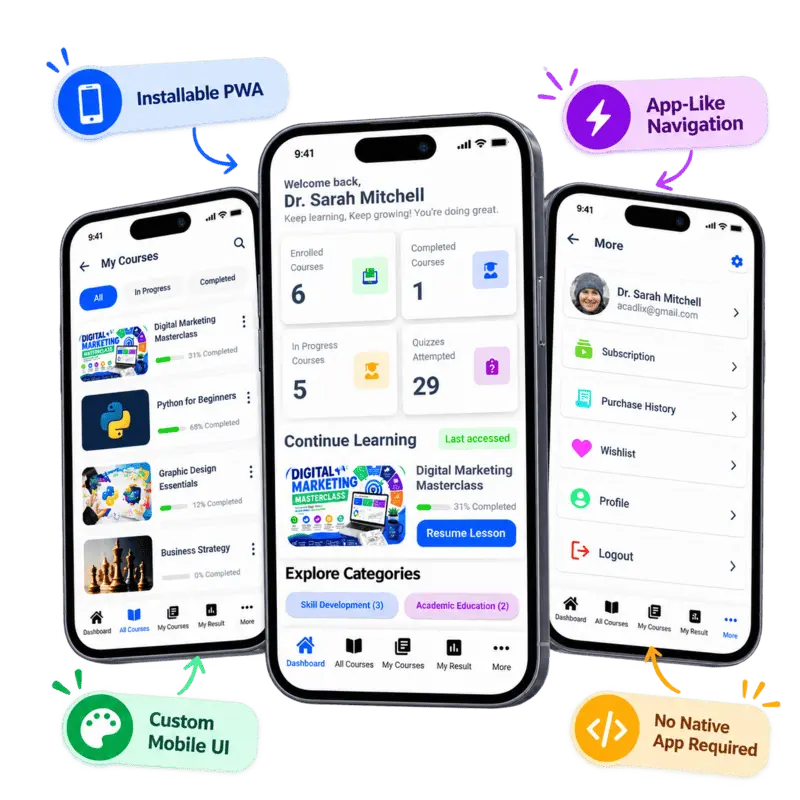
A mobile-friendly design is essential for an online course website. Students may watch lessons, attempt quizzes, and check their results using mobile phones rather than desktop computers.
Do not check only whether the homepage looks good on mobile. Test the actual learning experience.
Open a course, play a video, navigate between lessons, attempt a quiz, and review the results on a smaller screen.
Acadlix provides a student dashboard experience designed for course learning and assessment, including a Progressive Web App (PWA) option. Its dashboard uses a modern single-page application approach for supported student-facing pages.
This can help you create a more app-like learning experience, but you should still test your chosen theme, plugins, and configuration on real devices.
8. PWA or Mobile App
Getting an installable mobile experience can provide an additional advantage for an online learning platform.
A Progressive Web App (PWA) allows users to install a compatible website on supported devices and open it in an app-like interface.
Depending on your LMS and configuration, you may be able to provide a dedicated student dashboard, mobile navigation, and a more focused learning environment.
Acadlix includes PWA functionality for its supported student dashboard experience. This can be useful when you want students to access courses and quizzes through an installable web application rather than relying only on the regular website layout.
Remember that a PWA is not automatically the same as a native Android or iOS app. Installability, browser support, HTTPS, and the required application configuration still matter.
9. Support and Updates
You are a teacher, not necessarily a developer. Many times, you may need to ask the plugin author how a feature works or why something is not working as expected.
In such cases, documentation and video tutorials may not always be enough to clear your doubts.
Before choosing an LMS, check how the support team handles questions, bug reports, and feature requests. Also look at the frequency of updates, compatibility information, and the quality of the documentation.
A reliable support process becomes particularly important when your website starts accepting payments and students depend on it for their courses.
How to Sell Video Courses on WordPress
As we have discussed the prerequisites, you can now start building your website.
You will generally need the following:
- Web hosting.
- A domain name.
- WordPress.
- An LMS plugin.
- A suitable theme and any additional plugins you require.
- A payment gateway if you plan to sell paid courses.
Let’s go through the process step by step.
Step 1: Purchase WordPress Web Hosting
First, purchase web hosting from a provider such as Hostinger or Kinsta.
Choose a hosting plan according to your expected traffic, number of students, and website requirements.
If you plan to serve a large number of students or conduct examinations with many simultaneous participants, pay particular attention to server resources and performance.
Also consider where your videos will be hosted. Delivering large video files directly from your WordPress server can consume significant bandwidth and resources.
Step 2: Register a Domain Name
Your domain name is the address students will use to access your website.
Choose a name that is easy to remember and relevant to your brand or educational business.
Some hosting plans include a domain for an initial period. Check the offer and renewal terms before purchasing.
Step 3: Connect Your Domain With Hosting
If you purchase your domain and hosting from different providers, configure the required DNS settings to connect them.
If you purchase a compatible plan where the domain is already connected, you may not need to perform this step manually.
Make sure your website is accessible through HTTPS before accepting student registrations or payments.
Step 4: Install WordPress
Most hosting providers offer an installer that simplifies WordPress installation.
Follow your hosting provider’s instructions to install WordPress on your domain.
After installation, configure the basic website settings, create a suitable administrator account, and set up backups and security.
Step 5: Install the Required Plugins and Theme
Install your chosen theme and the essential plugins.
For example, you may need an LMS plugin, an SEO plugin, a security solution, and a page builder.
Avoid installing unnecessary plugins just because they are popular. Every additional plugin introduces another component that may require configuration, updates, and compatibility checks.
Step 6: Install and Configure the LMS Plugin
Now install your selected LMS plugin.
For this tutorial, you can explore Acadlix as an option for building a WordPress course website.
After installing the plugin, configure the available options according to your requirements. These may include course settings, quiz settings, notifications, student registration, payment gateways, and other learning-related features.
The exact configuration depends on the plugin and the type of courses you plan to offer.
Step 7: Create Your First Course
Once you complete the initial setup, go to the course management area and create a course.
Add the course title, description, thumbnail, and other required details.
Write a clear course description explaining what students will learn, who the course is for, and what they should expect after completing it.
If you are selling the course, make sure the title and description communicate its value clearly.
Step 8: Add Lessons and Learning Materials
Next, add the curriculum to your course.
Depending on your teaching requirements, you can organize the course into sections and add:
- Video lessons.
- Text lessons.
- Quizzes and assessments.
- Downloadable learning resources.
- Assignments or live-class information, where supported by your chosen setup.
With Acadlix, you can create courses, add lessons, use supported video sources, and create quizzes for student assessments.
Plan the curriculum before publishing. A well-organized course is easier for students to follow than a long list of unrelated lessons.
Step 9: Configure the Course Price and Payment Gateway
If your course is paid, configure its price and the supported payment method.
Check whether you want to sell the course through a one-time payment or a subscription.
Before launching, verify the complete purchasing process. Students should be able to select the course, complete payment, receive the appropriate enrollment or access, and start learning.
Do not assume that configuring a payment gateway automatically means the entire purchase workflow is working correctly.
Step 10: Test the Student Experience
Before sharing your course publicly, test it as a student.
Check the following:
- Can a student register and log in?
- Does the course page display correctly?
- Do the lessons and videos work?
- Can students attempt quizzes and view their results?
- Does a successful payment grant the expected course access?
- Are notifications working as expected?
- Does the dashboard work properly on mobile devices?
If you offer free courses, test the enrollment process for those courses as well.
It is better to identify these problems before students begin using your website.
Step 11: Publish and Promote Your Course
Once you have completed the setup and testing, publish your course and share it with your audience.
You can promote it through your website, email newsletters, social media, and relevant educational communities.
You should also create useful content related to your course topics so that potential students can discover your website through search engines.
Remember that publishing a course is only the beginning. You will need to keep your course material updated, respond to student questions, and improve the learning experience over time.
How Much Does It Cost to Sell Courses on WordPress?
The cost depends on the hosting plan, domain, LMS plugin, payment processing, and additional services you choose.
For example, your expenses may include:
- Domain registration and renewal.
- Web hosting.
- A free or paid LMS plugin.
- Premium design or additional plugins, if required.
- Payment gateway transaction fees.
- Video hosting and bandwidth.
- Email delivery or other external services.
You can start with a relatively simple setup using WordPress, a suitable free LMS plugin, and basic hosting. As your business grows, you may need better hosting, premium functionality, or dedicated video delivery.
There is no single cost that applies to every course website. Estimate the recurring expenses as well as the initial setup costs before deciding your pricing.
How to Host Videos for Your Online Courses
Video hosting deserves special attention because video files can consume a significant amount of storage and bandwidth.
You can use platforms such as YouTube or Vimeo, supported external video sources, or a dedicated video delivery service such as Bunny.net. Some LMS setups also allow you to use videos hosted on your own server.
The right option depends on your budget, privacy requirements, expected traffic, and desired playback experience.
For a paid course, check whether your video hosting solution provides suitable access controls. Simply hiding a video URL or disabling right-click does not guarantee that students cannot copy the content.
Also test video playback on mobile devices and slower internet connections before launching your course.
Final Thoughts
If you are a master of something and want to teach it to your audience, WordPress can be a practical way to turn your knowledge into an online course business.
You need to choose the right hosting, theme, and LMS plugin, create useful learning material, configure payments if required, and test the complete student experience before launching.
If you want to create a course website with video lessons, quizzes, student management, and built-in course-selling functionality, Acadlix is one option worth exploring.
You can start by exploring the Acadlix demo to understand how its course management and student-facing experience work before deciding whether it fits your requirements.
Ready to build your course website?
- Explore the Acadlix demo.
- Visit Acadlix to learn more about its features and pricing.
Start with the features you actually need, keep your website easy to use, and improve the learning experience as your student community grows.