
The Acadlix PWA (Progressive Web App) feature allows you to turn your WordPress-based learning website into an app-like experience without developing a separate native Android or iOS application. A PWA can be installed directly on a user’s device and launched from the home screen like a regular app, while continuing to use your existing Acadlix website and content.
With features such as app icons, splash screens, standalone display, offline support, caching, app shortcuts, and an Add to Home Screen prompt, you can provide learners with a more focused and convenient way to access courses, quizzes, lessons, and their student dashboard. This can improve the overall mobile learning experience while allowing you to manage your website and app experience from the same WordPress installation.
In this doc, we will walk through the Acadlix PWA settings and explain how each option can be configured to create an app-like learning experience for your students.
How to Enable PWA in Acadlix?
- Log in to your Wp-admin
- Navigate to Acadlix -> Addon
- Enable the PWA addon.
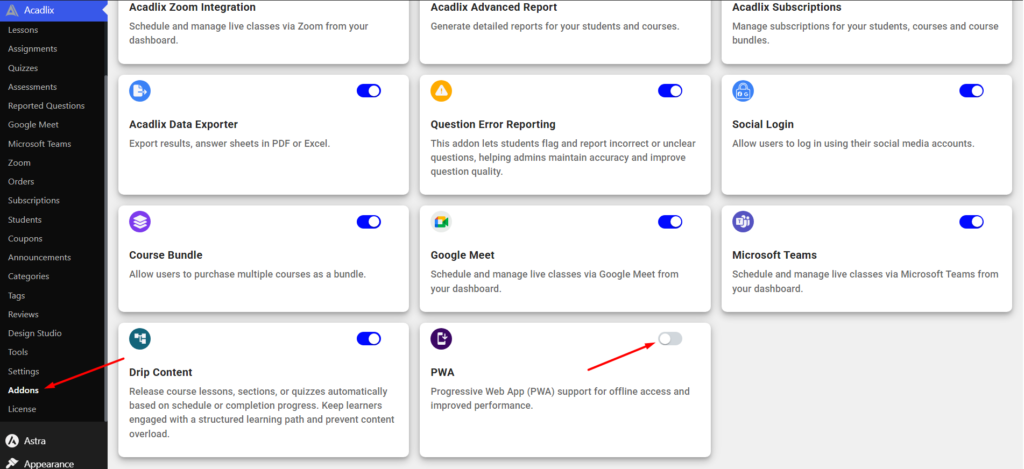
PWA Settings
Now navigate to Acadlix -> Settings -> PWA -> Settings
Now configure all the required settings as described below:
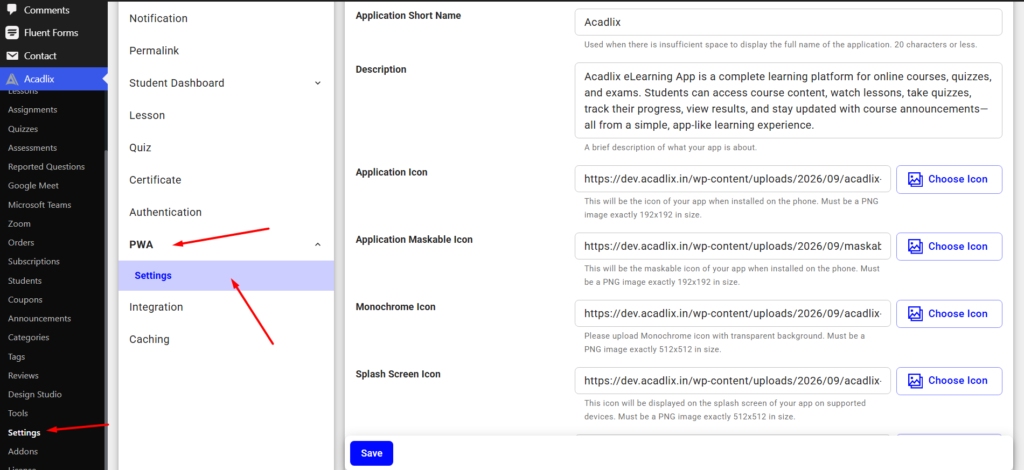
Application Name
Set the name of your application. This name is used when your website is installed as an app on a user’s device.
Application Short Name
Set a shorter name for your application. It is used in areas where there is limited space, such as the device’s home screen.
Description
Add a brief description of your application. This helps describe the purpose of your PWA to users and is included in the app’s web manifest.
Application Icon
Upload the primary icon for your PWA. This icon is used to represent your application when it is installed on a user’s device.
Application Maskable Icon
Upload a maskable icon for your PWA. It allows the app icon to adapt properly to different device shapes and prevents important parts of the icon from being cropped.
Monochrome Icon
Upload a monochrome version of your app icon. This icon is used by supported devices and interfaces that require a single-color app icon.
Splash Screen Icon
Upload an icon for the splash screen displayed when the PWA is launched on supported devices. This provides a branded experience while the application is loading.
Splash Screen Maskable Icon
Upload a maskable version of the splash screen icon. It allows the icon to adapt to different device layouts while keeping the important parts of the image visible.
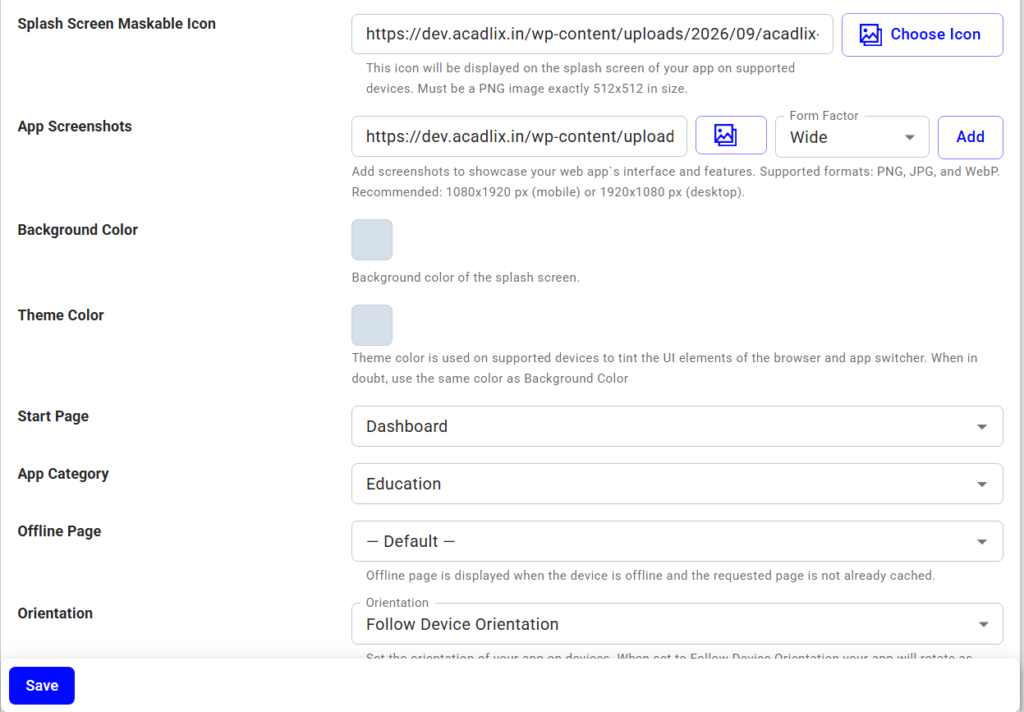
App Screenshots
Add screenshots of your application to showcase its interface when supported devices display app installation or application information. You can add multiple screenshots and specify whether each screenshot is wide or narrow.
Background Color
Set the background color displayed on the splash screen while your PWA is loading. Choose a color that matches your application’s branding for a consistent experience.
Theme Color
Set the theme color used by supported browsers and devices for elements such as the browser interface and app switcher. When the PWA is launched in standalone mode, this color is also used for supported interface elements.
Start Page
Select the page that should open when users launch the PWA from their device. We recommend setting it to the Student Dashboard so users are taken directly to their learning area.
App Category
Select the category that best describes your application. This helps supported devices and app stores classify your PWA appropriately.
Offline Page
Select the page that should be displayed when a user is offline and the requested page is not available in the cache. This provides users with a clear experience when an internet connection is unavailable.
Orientation
Choose how your PWA should be displayed on the user’s device. You can allow it to follow the device orientation or select a specific orientation for the app. “Follow the device orientation” is recommended.
Display
Select how your PWA should appear when launched. The Standalone option provides an app-like experience by opening the PWA without the usual browser interface.
Text Direction
Set the default text direction for your application. Choose Left to Right or Right to Left based on the language and content of your application.
Advanced Settings
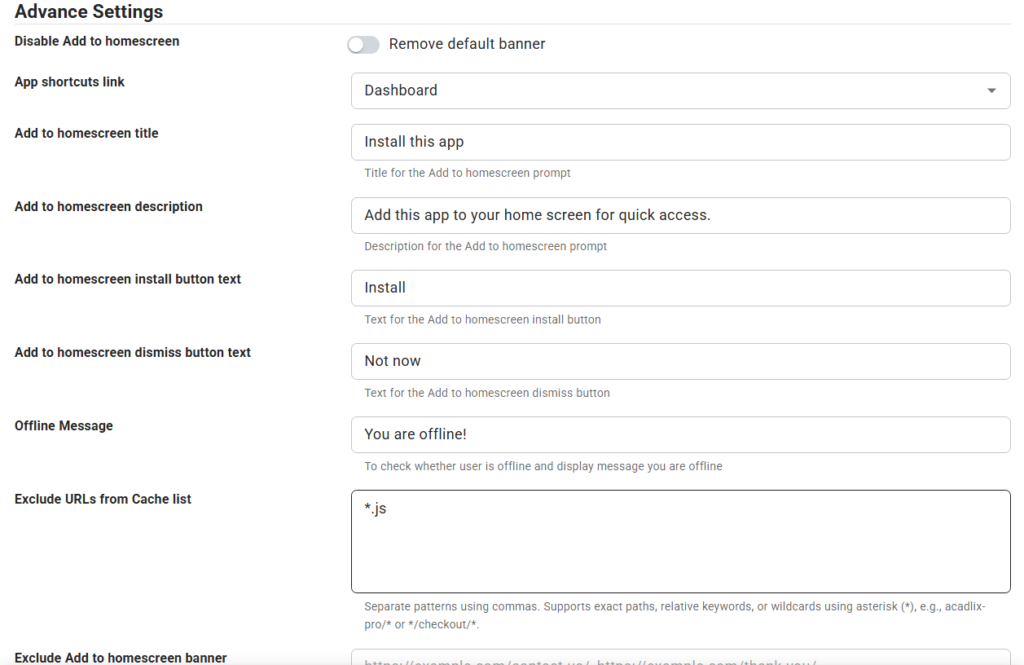
Disable Add to Homescreen
Enable this option to prevent the default browser Add to Home Screen banner from appearing. Use this when you want to manage the installation prompt through your own app interface or another method.
App Shortcuts Link
Select the page that should be available as an app shortcut. Users can access this link directly from the PWA’s app shortcut menu without opening the app first.
Add to Homescreen Title
Set the title displayed in your custom Add to Home Screen prompt. Use a short and clear title that encourages users to install the app.
Add to Homescreen Description
Add a brief description explaining why users should add the app to their home screen. This text is displayed in the Add to Home Screen prompt.
Add to Homescreen Install Button Text
Set the text displayed on the installation button in your Add to Home Screen prompt. For example, you can use Install App or Add to Home Screen.
Add to Homescreen Dismiss Button Text
Set the text for the button users can use to dismiss the Add to Home Screen prompt. For example, you can use Not now.
Offline Message
Set the message displayed when Acadlix detects that the user is offline. Use this message to clearly inform users that their internet connection is unavailable.
Offline Page Cache
Enable this option to cache the selected offline page on the user’s device. This allows the page to be displayed even when the user does not have an active internet connection.
Exclude URLs from Cache List
Specify URLs or URL patterns that should not be cached by the PWA. You can use exact paths, relative keywords, or wildcards (*) to exclude specific pages or resources from the cache.
Exclude Add to Homescreen Banner
Specify the URLs where the Add to Home Screen banner should not be displayed. Separate multiple URLs with commas to prevent the installation prompt from appearing on selected pages.
Status
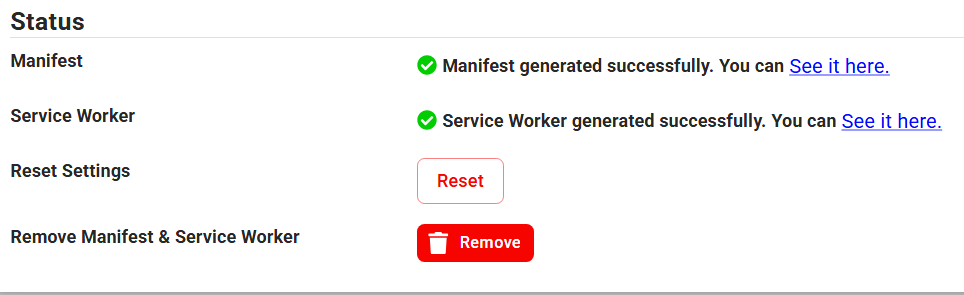
Manifest
Check the status of your PWA manifest. Acadlix displays a success message when the manifest has been generated correctly and provides a link to view it.
Service Worker
Check the status of the PWA service worker. A successful status confirms that the service worker has been generated and is available for handling PWA functionality such as caching.
Reset Settings
Reset the PWA settings to their default values. Use this option if you want to start configuring the PWA settings again from the default configuration.
Remove Manifest & Service Worker
Remove the generated PWA manifest and service worker from your website. Use this option when you want to disable or completely remove the PWA configuration Acadlix generated.
When you set up all the details, click the Save button. Once you click Save, your PWA (Progressive Web App) will be ready, and it will start displaying the Installation option based on your settings.